
At the beginning of the year I released a crochet pattern for a pixel & lace heart that was just a free-form kind of pattern. I was thinking about doing a tutorial video for that pattern, but then I thought of another way to use the pattern. Thus the pixel and lace heart scarf was born! This will be part 1 of the pattern & part two will be released this Friday with a full written pattern. I’ll also be releasing two tutorial videos to go with this.
Disclaimer: This post contains affiliate links which means I may receive a small commission if you buy something through my link or ad. This does not change your cost it just helps keep this blog running. Thanks for your support! See Privacy Policy & Affiliate Deals page for more information.
I had this note in the first posts, but it still applies here!
Note ~> This pattern uses the corner to corner {C2C} method, which you can learn more about at Make and Do Crew. I’m using a triple crochet stitch for my C2C boxes instead of double crochet. I will explain it further in the instructions, but it works up the same as the instructions, just replace the double crochet with triple crochet. For this post, I will walk through how many C2C boxes I used, the decrease, & how to skip the boxes at the center of the heart. Find the written pattern & Part 2 right here!
Check out these two posts for the original Pixel & Lace Heart pattern ~>
Supplies & Notes
I’m still using bulky weight {#5} yarn & size I {5mm} hook for this pattern. The yarn I’m using is Yarn Bee Alpine Authentic in Neutral & Sidewalk Hopscotch. These were part of my big Hobby Lobby yarn haul & I think they’ve been discontinued.

These yarns have a very subtle contrast which doesn’t provide much contrast between the hearts. If you want more contrast, use contrasting fabrics. Any bulky weight will work! : )
The first heart is worked up the same way as the one in the original pattern except for 2 things:
- You will stop with 5 boxes instead of 7 before decreasing.
- I changed the chain 3’s to chain 4’s & the chain 6’s to chain 7’s.

I will show y’all how that works out below, but it will be on a heart already joined to another heart. Mainly because I forgot to take pictures of the first heart in progress! It will be in the video! : )
Here’s the written pattern up to the 5 boxes for the first heart. Remember this assumes you know how to work C2C:
- Row 1 ~ ch 7; tr in 5th ch from hook & in next two ch {1 box made}
- Row 2 ~ ch 7 & turn; tr in 5th ch from hook & in next two ch; sl into ch 3 of first box; ch 4; 3 tr into ch 3 of first box {2 boxes made}
- Row 3 ~ ch 7 & turn; tr in 5th ch from hook & in next two ch; sl into ch 3 of first box; [ch 4; 3 tr into ch 3 of next box], repeat [ ] 1 time {3 boxes made}
- Row 4 ~ ch 7 & turn; tr in 5th ch from hook & in next two ch; sl into ch 3 of first box; [ch 4; 3 tr into ch 3 of next box], repeat [ ] 2 times {4 boxes made}
- Row 5 ~ ch 7 & turn; tr in 5th ch from hook & in next two ch; sl into ch 3 of first box; [ch 4; 3 tr into ch 3 of next box], repeat [ ] 3 times {5 boxes made}
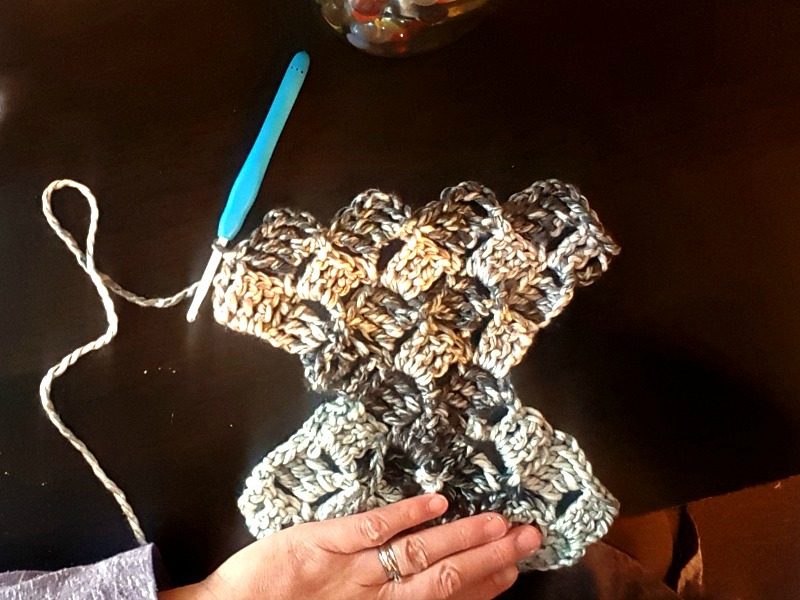
This is what it will look like at the top once you’ve stitched all five rows. It just won’t be connected to another heart yet!

Now it’s time to decrease for one row. After you finish the last box from row 5, turn & slip stitch in the ch 4 & 3 tr of the last box. Then continue making boxes, leaving off the last box. You should have 4 boxes on the 6th row.
On the 7th row, you will decrease for one box, then do some slip stitches to skip the center box.

Here’s the written instruction & picture detail for that part. I found it worked best if I slip stitched around the chain, then in the chain for the next stitch.
- Turn, sl stitch into the ch 3 & 3 tr of the last box, then make one more box. Slip stitch 4 times to the heart center, then 4 slip stitches back up the other side. You should end in the chain 4 of the 3rd box in the row below.

Now you just make one last box to fill in the last gap & your heart should now look like a heart!

Cut your yarn & weave in the ends.
Joining Hearts
To add the next heart, join your yarn in the top of the chain 4 space of the 2nd box on row 6.

Here’s the written instruction & picture detail for this part:
- ch 4, 3 tr into ch 4 below
- sl st to ch 4 of next box & 3 more times into ch 4

This picture is after I’ve started a new box & turned the work. The #1 & #2 are a repeat of the above picture, just from the back.

Once you’ve connected back to the first box, you’ll make 2 more boxes.

Then you just continue making boxes until you have a row of 5 boxes. You’ll start decreasing as before until your next heart is complete.

You can continue adding hearts until the scarf is as long as you like! In part 2 we will add the lacy border.
YouTube video is below!