
It’s Monday and that means it’s time for some sewing fun! Today has been a total “Monday” & that’s why this post is late. Monday gets all the blame! Haha! Today’s post is part 2 of Using a Photo for Fabric Art & it’s all about stitching. We’ll finish up the rose art quilt just in time for Mother’s day! I’ll discuss some stitch settings, sizes, and using a walking foot for quilting. I’ll even show you how to make it into a wonderful gift for Mom. If you don’t sew or this is too advanced for you, you can still use the techniques in part 1 & replace fabric with paper. That would make an awesome card!
Disclaimer: This post contains affiliate links which means I may receive a small commission if you buy something through my link or ad. This does not change your cost it just helps keep this blog running. Thanks for your support! See Privacy Policy & Affiliate Deals page for more information.

Selecting Stitches & Needles
The type of stitch you use is a personal thing. It also depends on the type of sewing machine you have. For this tutorial, I’m using my Brother BX3925PRW (very similar to this one). Here are the stitches available:

This machine has a digital read out that allows you to select the stitch number, length, & width. These are the standard settings for stitch number 19.

Before I begin stitching on my project, I like to do some test stitches in different lengths & widths. I’ll note what stitch it is & the settings for the stitch. This gives me a better idea of what stitch I want to use.

Another important thing to consider before stitching is the needle. I’ve always used Schmetz brand needles because they were affordable & locally stocked. They’ve always worked well for me!
I prefer to use a topstitch needle for decorative & quilting stitches. The eye of this needle is double the height of a regular needle which not only makes it easier to thread, it helps prevent thread fraying. This gives you really nice, even, & straight stitches.

The microtex needle is my favorite for piecing because it is very sharp and thin. I works really well with higher quality fabrics because they usually have a higher thread count. You just need to be careful when going over bulkier seams because it can break. That’s why I don’t use it for attaching overlapping applique.
There are many charts available about what size needle to use with what size thread. I’ve found that certain machines like certain threads no matter the needle size. Using high quality thread & the right needle for the fabric seems to be the most important factor in getting good results.
Stitching Tips & Techniques
Now that you’ve decided what stitches & settings you want to use, it’s time to sew! A good start can make things run much smoother. Make sure the needle is centered when starting decorative stitches. This is my standard presser foot & it has a notch in the center for alignment. Also be sure to pull the thread back behind the foot to help prevent tangled starts. Some like to pull up a stitch & pull the bottom thread to the top. I do this sometimes & sometimes I don’t – it doesn’t make much difference to me.

When you start on the edge of the fabric, the technique is much the same. Make sure the needle comes down right at the edge of the fabric, so there’s thread on the applique & backing fabric. Please excuse my fuzzy looking presser foot! I promise it gets cleaned on a regular basis!

Going around curves can be tricky even with a straight stitch. It does take a bit of practice! Just remember to go slower than normal sewing speed for you. I set my speed down a notch to prevent my lead foot from causing me to use the seam ripper! ; )
Once the back of that center bar gets to the edge of the applique, it’s time to pick up the presser foot & turn.

A decorative stitch works around a center point. If you need to turn left, make sure the needle is down on the far right. If your turning right, it should be down on the far left.
Below is an example of turning on an inside curve or corner. When my needle is at the edge of the fabric & the middle bar of the presser foot is over the fabric, it’s time to turn.

I try to eliminate starting & stopping as much as possible. Once I finish around one leaf, I’ll pull extra thread out and move the presser foot to the next one.

I used my number 19 stitch to go down the center of the leaves & started with the widest & longest stitch settings. After several stitches, I dropped to the regular settings, then to smaller settings. Make sure the needle is down in the center part of the stitch when changing the settings. This will prevent any odd jumping of the needle. Changing stitch types will require the needle to be up because the machine automatically moves the needle.

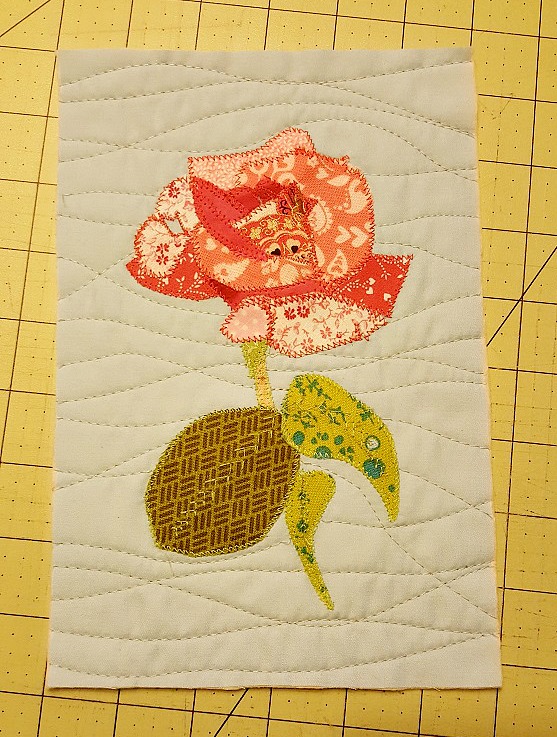
You can see how graduating the stitch settings makes the leaves veining a little closer to the real thing.
I changed my top thread & started in on the rose. The thread settings were changed in several areas to account for the smaller pieces. I even used a super tiny setting for that little center swirl!

All finished stitching the fancy stitches!

Quilting the Fabric Art
I plan on putting this in a picture frame, so I cut everything down to 5 x 9.

I like to use spray basting whenever possible! It holds the quilt sandwich together much better than anything else I’ve tried. However, it can be pricey! I found this basting spray on clearance at an out of town Walmart. Score!

I’m going to use a walking foot for quilting this because it’s great for straight & curved quilting – believe it or not! First you need to remove your regular foot by unscrewing the side screw.

The walking foot is much bulkier than a standard foot. It also has a lever that needs to go over the needle bar.

Hook the lever on the needle bar first. I usually have to push up on the presser foot lever to get the side part on. Tighten the screw & you’re ready to sew!

Usually you sew from the center out when quilting. This is so small, I just started at the top & worked my way down. All you have to do to make the wavy lines is move the fabric back & forth while it’s going through the machine. Easy peasy! I also change my stitch length from a 2.5 to a 3.5. This makes a nicer looking stitch to me! : )

I also did not stitch over my beautiful rose. Just stop stitching at the edge & pull extra thread out to go over it. Quilting over the rose would take away from it more that add to it, in my opinion. : )
I back-stitch in smaller sections & cut & pull the thread to the back in longer sections.

All quilted & ends fastened off!

I trimmed the edges off…
At this point, you could bind it & add a hanging pocket. I’m choosing to leave the edges raw & put it in a frame! This frame is a cheaper plain wooden frame I painted with chalk paint & then waxed. I added a pretty but subtle scrapbook paper in the back ground with double sided tape. The quilt is held in place with double sided tape as well.

Hopefully this was easy to understand! Please let me know if y’all have any questions. : ) See y’all on Wednesday for another DIY project!